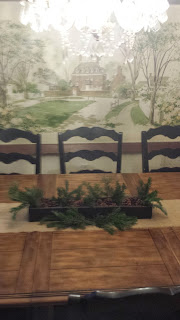
.

.
CLICK HERE FOR WEBSITE

Pages

Monday, December 16, 2013

CHANGE OF PLANS - HOLIDAY DECOR ...THE TREE


Sometimes the excitement of the holidays makes us want to do so much.   That is always the case for me, Holidays just adds a ton more projects for me to complete.

We just moved November 1st, so I haven't had much time to holiday plan.  With unpacking, decorating, then pulling holiday stuff our and trying to come up with themes and decor.

Im just plain exhausted.....this week will be the end of my Holiday Decor run.   I was planning on going all the way till Dec 23rd...but Im done folks.

My beautiful daughter Samayah is turning 7 this Friday and then her Daddy's Birthday is the day after that and then we have Christmas Eve and Christmas Day sooooooooooooooo Im done with tutorials on the blog.

I will be posting pictures on my Facebook page and of course always on my Instagram (Lucky7Design) page as well.

Here is my nature inspired tree.....we got a REAL tree (husband's request) for the big room in the back of the house.  Our Dining room and Living Room are split by this space, so that is the spot I chose for the tree.    Let's just hope the puppies don't rip up all the presents when Santa leaves them!

I used items I had already in my Christmas Decoration collection (hoarder's paradise .lol) I used glass balls, real walnuts, burlap wrapped candy canes, real pine conesl twig nests w/ eggs and handmade ruched burlap garland.

I would also like to add that I have eco-friendly gingerbread mean on my tree.  They are handmade recycled paper figures from my friend in California Kelli Moorhead Bianchi.  She makes amazing paper crafts and jewelry you can check our her Crafting on a Dime Facebook page HERE


The big bare tree


Some twinkle and the balls go on...a sage green and pale gold


Burlap wrapped candy canes


Handmade recycled paper Gingerbread Men


Real Walnuts


My nature themed ornaments


Close up of the top portion of the tree


Here she is......My Mother Nature Inspired Tree


After 3 Kings Day, the glass ornaments and burlap will come off and the tree with the walnuts, pine, cones and nests will go out to the backyard for whatever left over birds are around to enjoy.  

Maybe the girls and I will make some bird see balls for them too!  


- MJ



Sunday, December 15, 2013

BAKING STATION DIY - Holiday Decor Day 14 on Day 15


Well due to the snow storm that hit us yesterday....this Part 2 of my Baking Station post did not publish.

Im just sharing a little addition I made to that area of the kitchen, it has it's own archway, which was probably the end of the original house.

I found some pieces of wood that were in almost every closet as shelves.   Im not one for folded clothing, in fact it's a pet peeve of mine.    So when I saw this piece of wood in my daughter's closet...a project came to mind.

A BAKERY SIGN!!!!

Now I've seen them on Pinterest as well as on a few blogs, so I wanted to give it my own spin.

Here iS what I came up with................


Here is the old piece of wood


I pulled out my stencils and a pencil


Quick outline and some black paint...


7 cent Sweets anyone???


How about... Bakery - 7 cent cakes????


Well you can see which one I went with in the end. 


 -MJ


Friday, December 13, 2013

Holiday Baking - Day 13 Holiday Decor


Tonight Im sharing some Holiday in the....kitchen.  Well a nook of my kitchen that is opposite of the big refrigerator space.  

As most of you know, my oldest Gabriella is a pastry chef.  She has her own cupcake and sweets company and she works for a large bakery as well.

We decided to give her, her own space.  We call it the "Baking Station"....I searched for stainless tables and different things with no luck.  One day while at Harbor Freight....my husband spots this.

Yep...it's a metal work bench!    But it's durable and gives storage and work space...yay!   I made one alteration...I spray painted the peg board backing Metallic Metal (Silver).

We added some Holiday Cheer in the space with vintage items inspired by my great grandmother Vincenza's bakery.   She was a business owner back in the 30's in Brooklyn, New York

I guess my girl gets it from her Great Great Grand Mama!    Hope you enjoy!


Shot of the baking station


Flour Jar, Paper Straw Jar and Vintage piping gun

Glass bowl of cookie cutters, vintage tart tins filled with baker's twine


Some of her favorite baking books


My vintage jars filled with her confectionery and brown sugar


Metal Cook Book Stand holding some vintage rollers and my awesome Wonder Bread ruler!


Below Vintage milk crates are used to hold dishes.  I added a vintage Christmas apron for decoration.


Of course we must display our inspiration.  Nonna Vincenza in front of her bakery.  Russo's Bakery.


-MJ


Thursday, December 12, 2013

DO YOU JUDGE A BOOK BY IT'S COVER? - Day 12 Holiday Decor

Well I must admit that I do.   Not so much people but there houses, especially during the holidays.   I somehow in my mind think that if you don't take the time to decorate the outside of your home then, you are a bit of a Scrooge (just my opinion)


I was thrilled with the huge floor to ceiling bay window in the front of the house.   However it was blocked with 2 off centered shrubs (which also were the home to bees and their lovely hives.)

Today, my husband finally cut down the shrubs (YAY!!!!!!!!!!!!!!!!!!!)  He was motivated by the tree cutting crew who also came today and cut down the ugly tree in front of our home.

Here is what my holiday window looks like, Im not sure I will have time to add anything else outside with another storm coming in 2 days.


Tall zinc container w/ Christmas tree and a lil snowman


Vintage galvanized bucket w/ Christmas tree and tall snowman


My White Christmas tree w/ladder of lil helper to decorate the tree


So if you drive by my house....know that Christmas is my favorite holiday and inside you will find 8  more trees  and decorations to prove it.


Do you decorate the outside of your house?


-MJ


Wednesday, December 11, 2013

MINOR HICCUP - WHAT HAPPEN TO DAY 10

Ive been doing way to much, and it finally caught up with me.  I totally needed a day of rest so I missed on posting Day 10 Holiday Decor.

I don't pretype or schedule my posts.  I did that when I started blogging 3 yrs ago but it became so overwhelming...I decided I would post when I had something to say or share.

So since Im still feeling just worn out...Im going to share some Holiday Decor from a shop I styled earlier this month.   It's called Painted Past Designs and they are located in Madison, NJ.  Owner Donna is a fabulous furniture refinisher, she takes old pieces and gives them the most amazing makeovers with eco-friendly paints that are Made in the U.S.A.

Take a look and what we put together for the holiday up at her shop.  Also you can check out Painted Past Designs on Facebook HERE


-MJ

Monday, December 9, 2013

THE TREE............ - Day 9 Holiday Decor

Well 1 of the trees in the house this year.    My husband insists on a REAL tree but I like to start early so a FAUX tree is best for us decorating addicts.  

There is a battle every year at Christmas on who gets to decorate the tree and why do I have the need for a theme...blah...blah...blah.

My solution... FAUX tree will go in the Family Room and the kids will decorate it with whatever they want (well of course from my hoards of collections...lol) I have to have some control people!  The new house has a Family Room and Living Room so I get the REAL tree (with my theme)... YAY!

So here is our Vintage Junky Ornament Tree in the Family Room.  All ornaments on this tree are handmade, they are also family heirlooms from my grandmother's house and thrifted items.


This is a 6 ft faux tree from Family Dollar


My prized position at Christmas...the manger that my Grandfather Sal made so many years ago.  It goes under my tree every year!


2 of my 3 youngest girls decorating their tree.


Here she is...in all it's funky glory


Top to bottom....it's all vintage awesomeness!


Do you have any ornaments that were passed down, do you have a special ornament in your family?


This is from my Instagram account, this filter reminded me of an old 60's photo.


-MJ


Sunday, December 8, 2013

RUSTIC TABLETOP - Day 8 Holiday Decor


After working on projects for our Christmas tree I decided to jump in early and put together a little something for the dining room table.   This new house has a big room at the back with is where our 2nd living room (family room) and our dining room are situated.

I placed the Christmas tree in between both rooms, next to the back door (which is only used for puppy walking) lol

This is this year's REAL bare tree.


I asked the guy to give me the branches he cut from the bottom of our tree.


Still keeping my burlap runner on the dining table, grabbed this little wood tool box insert for the table


Filled with my cinnamon scented pine cones (love the smell)
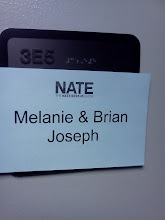

Cut and stuck in clippings from the tree (again great smell)


Some vintage brass candleholders and Shabbat candles (I use them often)


Added a gold glass ornament, here and there


The glow is so pretty and the setting is so simple


This year is simple, rustic with a touch of vintage glam.


Here is a shot from the living room side looking into dining room.


So cut some branches, grab a box and some pine cones and have at it!!!!


-MJ


Saturday, December 7, 2013

WHAT'S THAT ON YOUR TREE - DAY 7 Holiday Decor


Well the tree branches have settled nicely.  Last night while everyone was asleep, with a pounding migraine I strung clear lights (my pet peeve) on the tree.   Today I was still struggling with exactly how far I wanted to take my theme this year.

In that thought process I came up with some fun additions that will be going onto the tree this year.  Quick and easy and you most likely already have these items in your house right now.


Twine & Candy Canes ($2) and that's for about 2 dozen candy canes with the twine


Add a drop of hot glue to one end...and wrap away...and another drop to seal


C'mon doesn't get easier than that....great project for kids to do (use low temp glue gun)


Again, don't forget to check back to see what the final REAL tree will look like.


-MJ


Friday, December 6, 2013

HANDMADE TREE DECOR - Day 6 Holiday Decor

While Im not always the Queen of DIY, I do like to find less expensive ways of doing things.   This year in the new house...I wanted to decorate the tree with what we already had.  

I save my ornaments every year and had built quite a collection, unfortunately due to the move, many were broken and damaged.   But that's not going to stop me of course.

There are a few trees in the house this year.   As of right now the count is 5...not all large but I will be sharing the final trees the week of Christmas.

Im a huge fan of burlap as anyone who follows this blog or my IG and FB pages knows..lol    I wanted to incorporate some burlap in my tree this year....which I have never done before.   However spools of burlap ribbon are kinda pricey, not in my holiday budget this year.  

Sooooooooooooooooooo what do I do............  Break out the burlap scraps from the closet.

I just completed a wedding project of 12 ft burlap runners ( I ordered extra burlap for my own runners)


Nice sharp scissor needed for cutting


I cut approx 4 in strips (my runners were 12 in wide)


I then pulled a center piece of burlap thread and scrunched it down, then knotted at both ends.


Easy and simple....you can buy a yard of burlap at Jo-Ann's for approximately $3.99 and don't forget your coupons people (40% off single cut is big savings)


Check back to see how this looks up on the tree and what else I have planned this year.


- MJ