.

.
CLICK HERE FOR WEBSITE

Pages

Showing posts with label garland. Show all posts

Friday, December 6, 2013

HANDMADE TREE DECOR - Day 6 Holiday Decor

While Im not always the Queen of DIY, I do like to find less expensive ways of doing things.   This year in the new house...I wanted to decorate the tree with what we already had.  

I save my ornaments every year and had built quite a collection, unfortunately due to the move, many were broken and damaged.   But that's not going to stop me of course.

There are a few trees in the house this year.   As of right now the count is 5...not all large but I will be sharing the final trees the week of Christmas.

Im a huge fan of burlap as anyone who follows this blog or my IG and FB pages knows..lol    I wanted to incorporate some burlap in my tree this year....which I have never done before.   However spools of burlap ribbon are kinda pricey, not in my holiday budget this year.  

Sooooooooooooooooooo what do I do............  Break out the burlap scraps from the closet.

I just completed a wedding project of 12 ft burlap runners ( I ordered extra burlap for my own runners)


Nice sharp scissor needed for cutting


I cut approx 4 in strips (my runners were 12 in wide)


I then pulled a center piece of burlap thread and scrunched it down, then knotted at both ends.


Easy and simple....you can buy a yard of burlap at Jo-Ann's for approximately $3.99 and don't forget your coupons people (40% off single cut is big savings)


Check back to see how this looks up on the tree and what else I have planned this year.


- MJ

Friday, October 7, 2011

TODAYS TUTORIAL......

Tissue flower garland........I spotted this type in Better Homes & Gardens Halloween Issue.  I didn't  have the exact supplies so I did with what I had.

Here are the suggested supplies:


Natural colored coffee filters
White doilies (I substituted white tissue paper)
Black ribbon
Scissors
Pen
Plate (best in dessert size 4-6")


Here is the picture from the magazine..............


Better Homes and Gardens Halloween Issue 2011


I love this garland, but had to work with limited supplies


Coffee filters, White tissue paper, Scissors, Pen

I used my Pier 1 fall dessert plate to trace out circles on a stack of tissue paper


Then cut the circles out with scissors


Make a sandwich 1 white tissue - 1 coffee filter - another white tissue


Fold in half


Then in half again, so it looks like a cone shape


Twist at the bottom and wrap with floral wire...leaving at least 4-5 inches overhang so you can attach it to your black ribbon.   

From my event planning/ favor business I have huge spools of ribbon so I didn't cut until I was done attaching the flowers then snipped my ends and tacked onto wall.


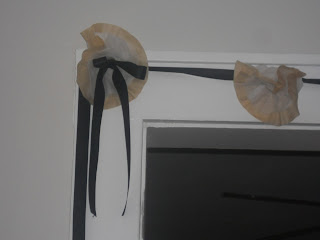
Here is my creepy garland over my living room/dining room archway


I added some black bows in the center of some flowers


I didn't want a very full garland for this particular holiday or archway, but it has given me a fabulous idea for the next holiday season Christmas! lol


-MJ